...
multimediaWidget Connector
|
|
An overview of working with Feature Selector in action.
Description
The Feature Selector node generates a grayscale mask from a selection of features in the input texture.
...
To create a selection from one or more features, you can bring the node into the 2D Viewport and use the node’s 2D Viewport Overlay. By default, the node creates one selection region, known as a segment. You can add and edit up to 3 segments, each containing a different selection region.
Alternatively, you can let ArtEngine automatically create segments with selections by using AI Assist with at least two mask inputs.
When you execute the node, it creates and outputs a black and white mask texture for each of the segments. The white pixels in this texture represent the features you selected. The rest of the texture is black.
...
| Action | Description |
|---|---|
Left-click | Select a single feature (left-click on its region in the viewport). |
Left-click and drag | Select one or more features (left-click and drag over their regions in the viewport). |
Ctrl + left-click | Deselect a single feature. |
Ctrl + left-click and drag | Deselect one or more features. |
Shift + left-click | Add a single feature to the current selection. |
Shift + left-click and drag | Add one or more features to the current selection. |
L | Press to activate or deactivate the Lasso Selection tool. |
Automatic selection using AI Assist
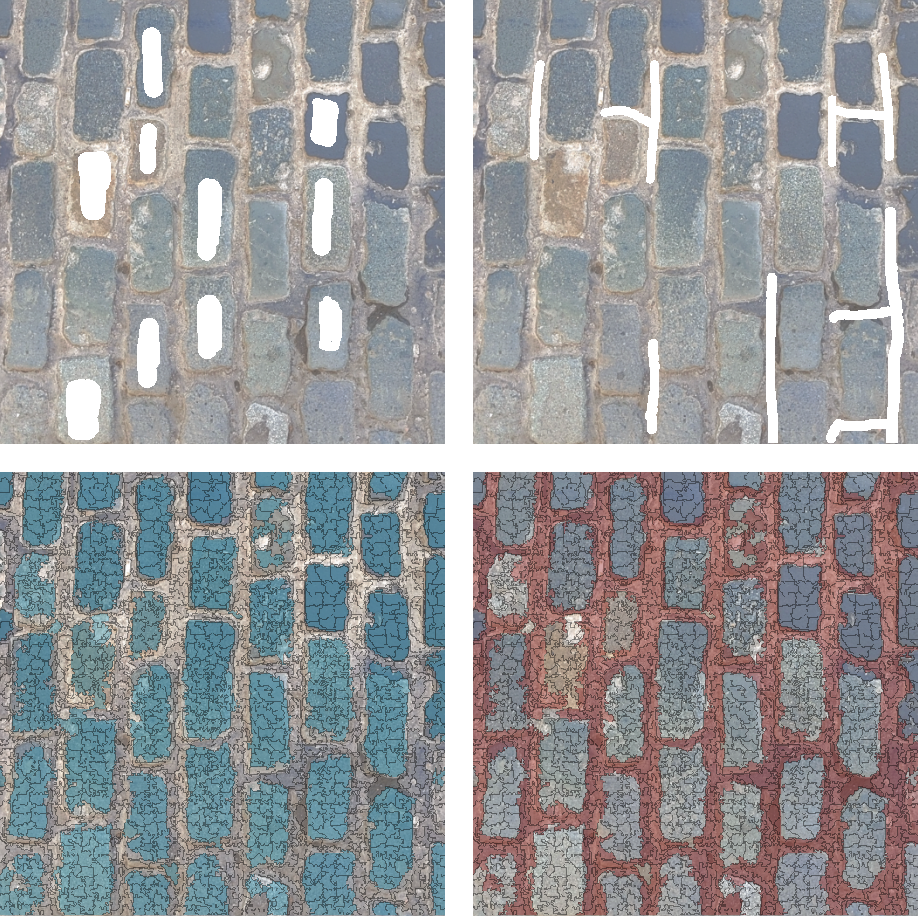
Two masks (above) and the corresponding segments identified by AI segmentation (below).
Feature Selector can automatically identify similar regions in the input image, and create selections from them, placing each selection into a different segment. To determine how similar any two features are, the algorithm uses a combination of surface texture and color influence. You have a degree of control over each of these in the Properties window.
To identify different regions, the AI segmentation algorithm requires at least two mask inputs in addition to the main input image. Each mask should roughly indicate a part of the input image that you want the algorithm to deem as a separate region. The mask does not have to be precise, nor does it need to cover most of the image. A few rough brush strokes are often enough for the algorithm to work.
For example, in a texture with bricks, you might use one mask to paint over a couple of bricks, and another mask to paint over some of the mortar.
To use AI segmentation:
- Create at least two masks of the main input image. Each mask should roughly indicate a different region of the image. For example, the masks may indicate two areas of different color or surface material.
- Connect the masks to the Mask1 and Mask2 inputs of Feature Selector.
- In the Properties window of Feature Selector, enable AI Segmentation by ticking the box next to it.
- (Optional) Change the Feature Bias and Texture Weight properties to fine-tune the algorithm behavior. Descriptions of these properties are available in the reference section at the bottom of the page.
- Execute the algorithm by pressing the AI Assist button.
- Once segmentation is complete, review the new segments created by the algorithm. For more information on working with segments, see the reference section.
Generating a mask from a selection
...
| Node category | Paint |
|---|---|
| Node execution style | Manual |
Ports
| Input Name | Input Type | Description |
|---|---|---|
| Input | Bitmap | The input texture you want to select features from. |
| Mask1, Mask2, Mask3 | Bitmap (Mask) | The masks that Feature Selector uses for AI-assisted selection. |
| Input Name | Output Type | Description |
|---|---|---|
| Segment 1-3 | Bitmap (Mask) | The output mask texture, which contains a representation of the selection. |
Properties
...
| Property/Setting | Description | ||
|---|---|---|---|
Granularity | Controls the size and number of features that the node breaks the input texture into. Higher values produce a higher number of, smaller features. | ||
| Color | Controls how strongly color similarity influences the formation of feature regions. At higher values, the node is more selective in judging colors as similar. As a result, the feature borders follow different colors more precisely. | ||
Regularity | Control how blocky the features are. At higher values, features maintain a primarily square shape and are more similar to each other in size. | ||
Smoothness | Controls the smoothness of feature region borders. At higher values, the node avoids adding many small pixels along feature borders, effectively smoothing them out. | Overlay Color | Specifies the color of the selection |
AI Segmentation
This part of the Properties window contains settings that are specific to AI-assisted segmentation.
| Property/Setting | Description |
|---|---|
| Feature Bias | This property influences the segmentation behavior based on the surface texture of the input. The available options are:
|
| Texture Weight | Control the balance of influence between surface texture and color during AI segmentation. Higher values place more importance on surface texture, and lower values place more importance on color. |
| AI Assist | Click this button to execute AI Assist when you connect two or more masks to the Feature Selector node. |
Segment settings
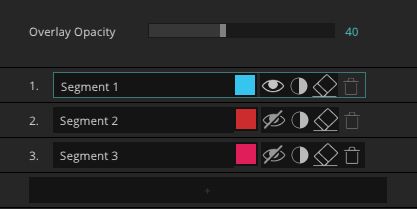
Below the AI Segmentation settings is a list of selection regions, or segments, present in the node. You can edit each of the segments and add or remove features from them using the 2D Viewport. The Overlay Opacity controls the opacity of the Feature Selector overlay in the 2D Viewport.
...
Overlay Opacity
...
Each segment in the list has the following controls, listed in the order that they appear:
- Segment Name - determines the name under which the segment appears in the outputs of Feature Selector.
- Segment Color - controls the color of the segment overlay in the 2D Viewport.
- View Segment - enable to display the chosen segment in the 2D Viewport and enable editing for its selection region.
- Invert Selection - invert all selected features in the segment.
- Clear Selection - remove all features from this segment’s current selection.
- Delete Segment - remove this segment and its selection from the outputs of the node.
The Add button below this list adds another segment to the list, up to a maximum of 3.