Output
- Alice Hinton-Jones (Deactivated)
The Output node exports textures and materials from ArtEngine. It can automatically create Unity material files from ArtEngine materials, and export them either directly to a Unity project, or as a Unity Asset Package. Alternatively, the Output node can also export textures and materials to a hard drive location on your system.
In order to access Unity-specific export options, you must connect a material as an input of this node. The options are not available for single textures.
You can specify the location and the output file format, as well as a preferred file naming structure. This is useful for organising big projects with many materials.
For materials, you can also specify the file extension and bit depth individually for each map.
Usage
To export a texture or material using the Output node, follow these steps:
- Create a new Output node on the Node Graph. It can be found in the Output category of the Node Library. Alternatively, select the node you want to output, right-click it in the graph, and choose Create Output Node.
- Plug in the Bitmap or Material you want to export from ArtEngine into the port on the Output node.
- Set the Output path to your preferred destination, and customize the File structure field to change the name of the output.
- Optionally, configure additional output settings in the node’s Properties window. You can learn more about what each option does in the Properties section below.
- Click the Export button in the Properties window to output your files. Alternatively, you can also execute the Output node on the Node Graph.
- Find the exported files in the output folder you specified.
Category and execution
| Node category | Output |
|---|---|
| Node execution style | Manual |
Ports
| Input Name | Input Type | Description |
|---|---|---|
| Bitmap / Material | Bitmap / Material | The Bitmap or Material that the Output node saves locally on your hard drive. |
Properties
Common settings
These settings appear regardless of the input type of this node.
| Property/Setting | Description |
|---|---|
| Input Type | Choose between Bitmap and Material to determine whether the node takes a single texture or a material as input. This property will change automatically depending on the type of input plugged into the node. |
File structure | Specify the file name structure for the export. Individual Bitmap names will be added on top of this file name. To modify names for individual Bitmap types, use the Bitmap Naming Preferences button at the bottom of the Properties window. You can propagate the following information into the output file structure:
You can click each of these buttons to add or remove the corresponding element from the file structure. |
| Preview | Displays a preview of the output file name. |
File Type | Select the output file format and image bit depth. The formats available are JPG, PNG, EXR, TIF, and TGA. The available bit depths are 8bit, 16bit, 32bit, and input; with input being equivalent to the original bit depth of the input image. Note that you cannot select a bit depth higher than that of the original input. |
Discard alpha | Enable this option to discard the Alpha channel from each input texture during the export process. This option is useful for texture optimization, as most materials do not typically utilize the alpha channel in any of their maps. |
Overwrite Existing | Enable this option to automatically overwrite any existing files with matching file names in the specified output path. |
| Output path | Specify the output folder path where files will be saved. You can enter the path manually, or use the Browse button on the right to navigate to the desired output folder. |
| Bitmap Naming Preferences | Opens a new window to customize individual bitmap naming preferences. See the Bitmap Naming Preferences section for details. |
| Export | Once you are happy with your Output settings, click this button to export your input with the parameters specified. This is the same as executing the Output node in the Node Graph. |
Open Output Folder | Click this button to open the export destination folder. |
Material-specific settings
The following settings only appear when a material is connected as the input of this node.
Material Customization
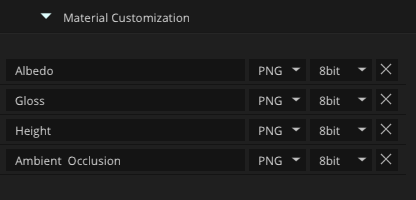
Select which of the input texture maps should be packed into the material export, as well as their file format and bit depth.
The available file formats are JPG, PNG, EXR, TIF, and TGA. The available bit depths are 8bit, 16bit, and 32bit, depending on the bit depth of the input texture. You cannot select a bit depth higher than that of the original input.
To exclude a map type from the export, click the cross button to the right of the map type name. To include the map type again, click the plus button which replaces the cross when a map type is excluded.
Unity Shaders
When exporting for Unity, use this section to customize the type of export (either as an Asset Package or directly to a Unity project), as well as the target render pipeline and shader for this material.
For more information about exporting to Unity, see the article on ArtEngine to Unity workflow using Unity Direct Link.
| Property/Setting | Description |
|---|---|
| Export type | Choose between Unity Package and Unity Direct Link. With Unity Package, the Output node exports a .unitypackage file with your material and all of its textures. This file format is natively supported in Unity and can be imported into any project without any additional plugin requirements. See the article on importing local asset packages. With Unity Direct Link, the Output node creates a Unity material (.mat) file in your destination folder (usually the Unity project folder). You can re-execute the Output node to update this file, and the changes to your material will immediately reflect in the Unity editor. |
| Target shader | Choose the target render pipeline and shader. The available shaders are:
|
Bitmap Naming Preferences
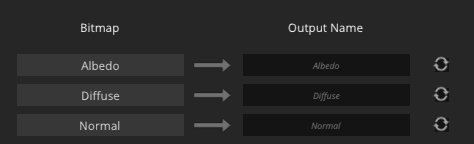
The Bitmap Naming Preferences button brings up a new window which allows you to individually adjust file names for each Bitmap type in the input.
In this window, the Bitmap types are listed on the left, and the corresponding output file names are on the right. Click any of the fields on the right-hand side to change the name for all output textures of that type.
You can also use the Reset button to the right of each file name to revert it to the default.
When you are done changing the Bitmap Naming Preferences, click the OK button at the bottom of the window, or the Cancel button if you want to discard the changes.